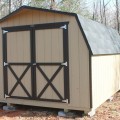
Posts

If your dog spends a significant amount of time outside, he or she might need a dog house or kennel to provide protection from the elements (snow, rain, etc.), escape from the cold, shade from the sun and, in general, a place to feel safe and secure—like a den.

A quality dog house can last a long time when properly maintained. Here are some tips to keep your best friend’s shelter up to par as well as some ideas for improvements:

  • Check the roof for leaks—replace shingles as needed—and make sure nails do not go through roof! Eventually, you may have to repair the roof.
  • Replace any worn wood, or repaint any areas that are faded/chipped.
  • Check the ground; make sure the dog house is still on a flat surface. Consider adding a foundation (or even place atop a pallet) to give some room between the floor and hot or cold ground.
  • If you live in a colder climate, consider adding a vinyl flap to the door to help keep cool air and elements out. Insulation or waterproofing are two other ways to help keep the dog house comfortable and dry.
  • Check every week or so to make sure straw and/or bedding is clean and dry; while not technically a repair, the living conditions are important to monitor regularly.
  • Monitor your dog’s growth—if you got your dog house when he was just a puppy, chances are he could’ve outgrown his cozy shelter. You might need to upgrade to a bigger dog house or even a kennel.
  • Trim weeds around your dog house, and be sure to use pet-friendly pesticides for any landscaping/gardening near your dog house.

In today’s busy era, it’s easy to “set it and forget it”, but when it comes to your dog’s health and safety, you should keep up with his outdoor accommodations and address any repair needs as soon as possible.

Remember! Dog houses provide great shelter, but pups also look to their people for companionship and fun—they’re social by nature. 

Your backyard provides you and your family respite—and chances are your family includes a furry friend or two.

If your property includes outdoor structures, such as sheds, gazebos, or playhouses, have you thought about making those pet-friendly? Here are a few things to consider:

  • Add a pet door to structures to allow dogs or outdoor cats to go inside (where appropriate, of course).
  • Attach food or water bowls to the outside wall of structures to provide a permanent place for feeding time outside.
  • Add insulation and/or pet-safe flooring to structures if you’re planning for them to double as a place for your pets to seek shelter.
  • Don’t just think about lawn chairs for people! Add a pet bed or play structure or two inside your gazebo so your cats and dogs have a place to lounge with you. You could do the same for inside sheds, workshops and playhouses.
  • Hardscape the edges of your structure with rocks to prevent digging along the edges of the foundation. This also adds a nice aesthetic element!

Of course, outdoor structures may be made specifically FOR pets too—we offer a variety of dog houses and kennels. 

Your structures are practical—they store items or provide a sanctuary. But they also add to the look and feel of your property. The weather—rain, ice, sleet, snow and even sun—can damage your structures and whatever is inside them. But you can be proactive protecting your structures from weather damage by considering the following points.

Flooring

First things first. When you’re installing your structure, you need to consider the floor. We might instantly think of a solid roof when it comes to leak-proofing a building, but moisture can also come from the ground. It’s best if your structure is elevated slightly, perhaps six inches above the earth. Pay attention to the quality of your foundation. If your structure is already up before your experience these moisture issues, you could look into raising it.

Roofing

Choosing the right pitch for your roof based on the average rain and snowfall of your locale is a good starting point. Flatter roofs don’t last as long as their sloped counterparts in areas that receive a significant amount of heavy snow. Selecting the right roofing material for your climate also plays a role here; maybe a metal roof is a better option, or perhaps shingles will do just fine.

To weatherproof your existing roof, you could install a rubber membrane along the bottom edges. Or you could also upgrade your roof to a more durable material.

Exterior

You can protect your entire wooden structure—weather it is a shed, garage or gazebo—from the elements by sealing it. Wood absorbs moisture, so using a sealer and/or oil-based paint adds a barrier between your walls and water. Don’t forget interior walls—these can be sealed too. Also, it’s important to note that the sun can also do damage. Consider a sealant or exterior paint that also protects against harmful UV rays.

Remember to routinely inspect your structures for signs of weather damage so you can get to any repairs before major issues arise. By staying one step ahead of Mother Nature, you can keep your structures in tip-top shape. 


Leveling Your Valley Structures Buidling

Leveling your Valley Structures storage building begins as we off load the storage shed onto 4 – 4 x 8 x 16 cap blocks, one at each end of the outside skids.  We then place the level on the floor inside the Valley Structures building. We use a jack, sometimes two jacks, to raise the shed until it is level side to side with the highest of the initial 4 blocks. Using a shovel we level off the spots where we place the blocks at the base of each pier. We use only as many blocks as are necessary to be leveled with the highest point. Next we turn the level to check for front to back leveling and adjust the block in the in the piers as necessary to be sure that the Valley Structures building is level both side to side and front to back.

If you choose to watch us complete this task we suggest you watch the doors of your storage building. You will notice as we work that the doors will rise up and down shifting passed each other. Finally as the job is complete you will see that the doors are perfectly lined up.

The size of your Valley Structure building determines how many points we support. The general “rule of thumb” is for supports to be places every 6’ – 8’ along the outside skids and at the ends of the inside skids. The “rule of thumb” may be altered by how you intend to use the Storage Shed, i.e. as a shop with heavy equipment as opposed to general storage. Just talk to our Valley Structures staff and we will be sure the leveling is done to suit your usage. 2. We use the following types of blocks to level your Valley Structures building: 2”, 3”, and 4” “cap” and 8” open web blocks. We use the 4” cap block at the base of each support pier. We never use an 8” open web as the base block since they tend to sink much more quickly. 3. Once the shed is less the 2” out of level we use Pressure Treated decking and Cedar shims to fine tune the leveling. These materials are used due to their ability to with stand the elements. 


When you think of roofing, a shell of framed timber probably comes to mind. But there’s also an array of hardware involved in supporting your structure’s roof. Ties and hangers are crucial components, usually made of steel, that are made to resist tension. Let’s a take a look at some varieties.

Rafter Ties

Rafter ties hold together the bottoms of opposing roof rafters, and they’re intended to keep the walls from spreading apart.

Joist Hangers

Joist hangers strengthen a load-bearing connection. These components come in many sizes, dictated by the size of the beam. Experts will agree that using the proper nails—and proper amount of nails—affect the integrity of the installation.

Hurricane Ties

Hurricane ties are often required components in homes in areas prone to severe windy weather. If your residential or commercial buildings need hurricane ties, then you should also consider them for your outdoor structures. Hurricane ties, which are nailed to the bottom of a rafter or truss and connect to the wall plate, work to prevent the uplifting of trusses.

Seismic Ties

Like hurricane ties, seismic ties help hold things together—literally—when things shake up. Regions that could be impacted by an earthquake use seismic ties to secure items to walls. For example: machinery, appliances, desks, filing cabinets or shelving. 

Just like your home’s roof, you must pay attention to the condition of your rafters and trusses that support the other structures on your property. Roof trusses provide the framework between load-bearing walls—that means they’re quite important. You’ll want to continually inspect the integrity of these structural components, and address any issues at the first sign of damage.

Moisture is the biggest culprit of roof damage. Over time, water damage can lead to weakened trusses. Insect infestation also creates deficiencies in strength. Finally, a heavy load on your roof also can cause structural issues. Here are a few things to look for when inspecting your trusses or rafters:

  • Bowing
  • Cracks
  • Splits
  • Holes (from insects)
  • Fungus
  • Mildew
  • Rot

Repairing is the first option to restore strength, but be sure to enlist the “support” of a professional or consult a good DIY guide before you begin; since trusses hold the weight of your structure, you don’t want to make a cutting mistake that could bring the roof down.

If your issues are beyond simple repair it may be time to update your roofing system. Or if you’re planning to add an addition to your structure or put in features (such as skylights or ventilation), you might find you’ll need an update to support your desired changes an upgrades.